Internal External Spaces
Body in Space
TARGET GROUP
Adults with mixed disabilities (mainly intellectual disability and Down syndrome)PARTICIPANTS
18-22DURATION
2 hoursORGANIZATION
Onassis StegiGoal - Essential question
The workshop’s main objective is to contribute in the creation of an artistic identity by the participants through dance improvisation.
The main goal is to develop the students’ capacity for self-action and free expression, enhance their communication with others and lead them to understand some fundamental conventions defining dance exercises or scenes, while expanding their kinetic skills.
Objectives
The lesson’s objective is the improvement of our body awareness in space, of the awareness of our kinesphere in relation to the kinesphere of others, and the stimulation of our imagination in relation to space.
- How can one space or an imaginary space impact our movement? What feelings do different spaces and our movement through them cause us?
- Can we view a two-dimensional image as a three-dimensional space? How does our movement shape space? Why does everyone see something different depending on their position in space? Does our position influence our decisions and desires?
Vocabulary
internal landscape, negative space, physical and imaginary spaces
PROCEDURE | Group warm-up following the educator’s direction. (20 minutes)
We close our eyes and turn our attention to our breathing and to the way our stomach inflates and deflates. If our breath is high up in our chest we take some time to relax and let it go lower in our stomach. We place our hands on our stomach and feel the movement our breathing causes them, we feel the volume of our stomach increase and decrease, our body’s three dimensions. After that, we peel our hands off our stomach as we imagine our stomach inflate like a ball and grow. With the inhale our arms spread, with the exhale they close, as if this movement is caused by a ball inflating and deflating, constantly growing larger, until we reach the largest spread of our arms.
We let the movement fade and we let our breathing go back to its natural rhythm. We open our eyes and we slowly bring our hands near them. We observe them and start making shapes with them and seeing the surrounding space and the rest of the group through these shapes. With our hands we form binoculars, a telescope, we look through our fingers, we limit our sight with our palm, with our palms open or in a fist, at different angles. We really look at the surrounding space and the people around us, framing everything in a different way constantly. We then move our whole arm, creating “windows” with our elbows, our forearms, our wrists, looking around the whole arm, seeing different areas of the surrounding space, of other bodies, discovering through the strange lenses the world anew.
Transition (5 minutes)
We spread around walking. We look at the rest of the group with a lively gaze, we activate our peripheral vision so that we do bot only see those who are in front of us, but that we are also aware of what is happening and who passes near us. We vary our speed following the educator’s or some other student’s pace, and we try stepping in every direction. At first we get used to walking backwards, then walking sideways, and in the end we change directions at will.
This exercise can be done in endless variations and can be repeated in almost every lesson. It awakens the body and mind, gives students an overall awareness of space, releases extra energy through the fast walking and the running, enhances the group feeling and, in general, clears the mind for the following exercise.
1st Activity individual work (15 minutes)
As we walk (end of the transitional exercise) the educator gives the instruction that the ceiling is slowly lowering on us. We feel the space above us getting slowly smaller, until it reaches our heads and it keeps lowering. We keep moving around as we did when we were walking but we find ways of doing it without any of our body parts exceeding the height of the imaginary ceiling. We look at each other so that the ceiling is at more or less the same height for everyone. The ceiling keeps lowering until it almost reaches the floor and we have to crawl in order to move. We then imagine that the ceiling is made of paper and we can tear it apart with different body parts or that it is a regular ceiling that we can push back up. Following that, vertical walls appear that obstruct our walking, or small walls we have to climb over, steps, holes in the ground in which we must not fall, narrow pipes through which we have to pass, beams we have to bend so as not to hit, holes in the walls up high or down low etc.
The aim of this exercise is to cause as many movements as possible, as many changes to the level we stand at in space (low, medium, high), the stimulation and activation of the whole body, but also of the imagination. A nice variation of this exercise is for the students to divide in two groups each of which will place such “architectural elements” in the classroom. Then, they will watch the other group bring to life the imaginary internal space or an imaginary track only through their movements.
Exercise development:
1. This improvisation can develop into a group level with the students working together helping each other, for example, in climbing a high wall.
2. Also, it can be varied with the people of one group creating with their bodies physical obstacles or architectural elements that the other group must overcome or pass through.
2nd Activity | in pairs (20 minutes)
The students get in pairs and spread around. They both start moving (without a leader) in very very close proximity to each other, without however touching. They start very slowly, as if exploring the surface of the other body, its morphology, and size.
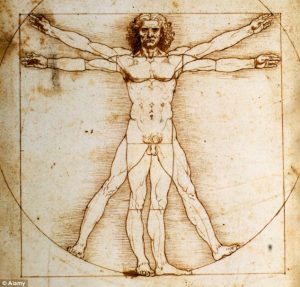
Following this, the movement expands in the so-called negative space of the other’s body, that is in the whole space of its kinesphere (its sphere is defined by the edges of the hands and feet when they are fully extended, a bit similar to Da Vinci’s Vitruvian man). Also, we highlight the importance of the space that empties as the body moves. That is, when the torso bends, then negative space is created in the area above the pelvis from where it left. During this exercise it is important to keep a balance between the initiatives of each member of the pair, because it is easy to end up with one leading and the other following. In regular intervals, so as to clear our minds and movement, we stay still for a few seconds or we move away and come back to begin again.
During the exercise we can focus on different points: on the range of the movement (exploring the whole range from the smallest movement to the largest), on the variations of the rhythm and of the dynamic of the movement, on the movement through space.
As the exercise is performed we can remove some of the pairs from the centre to observe the others, so that everyone will become both the observer and the acting party. Also, we should highlight that as long at the main instruction is followed, that is that we move in each other’s kinesphere, we can explore opposing or different rhythms, dynamics and sizes, observing how this “asymmetry” and this autonomy within the pair can make the exercise more interesting.
3rd activity | in groups (15 minutes)
We ask for one member of each pair to move to the centre of the classroom and the other member to move to the periphery and rest.
Those in the centre will create a “net”, finding some stable contact points with those directly next to them or those next to the person directly next to them. It’s best if the positions in this net are as different as possible (that is, not everyone to be standing with their legs open) so that the final shape is as complex as possible. When the net is as stable as possible the rest of the class is instructed to pass through the net and create an “embroidery” in both directions.
Then, the net can start moving slowly, changing the areas through which the others can pass. Also, those passing through can help each other with the passing, pulling, pushing or providing extra support. This way someone can climb over the shoulder of someone in the net who is standing, or pass through a more difficult spot. In general the movement is slow and gives a sense of resistance. Those passing through the net pay attention to their movements when they exit the net as well. That is, the exit, the choice of the next entry point and the route until the passing are equally important as the actual passing. Also, the people who constitute the net, do not stay idle, they slowly change their grips and holds transforming the net. | Role shift.
Security
Concentration and the avoidance of any talking is key to this exercise. In general, for this exercise, it is helpful to play some music that creates the impression of constant flow (with no particular rhythm). Because some falls are bound to happen, some clumsy passings, we encourage the net to also move protectively so as to prevent these falls.
Discussion (10 minutes)
We sit wherever we were when the exercise ended and we close our eyes to remember how the lesson developed from the pairs with the “negative space” to the group net. We start a discussion on the previous exercises.
How did the experience of movement change when we shifted our focus to the wider space around us (to the imaginary architectural spaces) from our personal kinesphere and our pair’s kinesphere? Who tended to lead and who to follow? Where there pleasant and unpleasant moments with the ‘net’?
4th Activity | in groups (30 minutes)
Having worked in the previous lesson on transferring some basic terms of drawing like straight and curved lines, the thickness and texture of a brush stroke and the colour, we will end in a series of improvisations using paintings of famous modernist painters.
The group is divided in two smaller groups. Half are seated with their back to the wall onto which the images will be projected, without peeking! The rest are seated in front of the first line. The educator signals the beginning of the improvisation and the students enter one by one, with no set order.
After they enter the “stage” they see the painting and start “translating” it into movement. We can say that the improvisation is a live version of the painting, or that the students are moving inside that painting. What is interesting in this exercise is that everyone can interpret the subject or the style of the painting in a completely different way. For example, in the pointillist painting that I have attached someone can focus on the style, that is the small strokes of the paintbrush, or on its subject, the still life on the table.
After one by one entering, always being very observant of what is already happening on the “stage”, the improvisation continues for around five minutes and the educator or one of the members of the audience signals its ending. After that, the audience has to describe, not the dance-improvisation that they watched but how they imagine the painting that inspired this improvisation. It’s best if the discussion begins from elements of style, shapes, lines, textures, colours and only in the end go on to thoughts on the subject of the painting (if there is one) because this discussion can very easily digress. Often the similarity between the original painting and what the audience describes is impressive!
It’s best if this exercise is done two or four times during one lesson, that is with two or four paintings as inspiration. The choice of paintings is rather important. For us, our main criterion is the clarity of the style, as well as the contrast between them when we do two or four consecutive improvisations. The improvisation can be accompanied by music, but, since this often affects the participants a lot, it’s best if the music has been chosen beforehand so it enforces and supports some of the painting’s elements.
Warm down (5 minutes)
We are still at the spots in which the last improvisation with the painting ended. We give the instruction for everyone to move slowly through an imaginary tunnel to reach the circle. We explore the tunnel walls, we feel the ground texture, we follow the tunnel’s shape, size and route within the classroom. Reaching the circle, we close our eyes and stretch our right arm towards the person next to us. We explore the shape and volume of their torso, focusing on the three-dimensional nature of the body. We relax and enjoy the feeling of the hand of the person next to us on our own body.
Contextualizing - Revealing information
In the past years we have found they idea of learning through the “translation” of other stimuli very interesting. This “translation” can happen between different expressive means, that is between movement, music, fine arts and various word forms. One of our reference points, mainly on the role of the educator in this process, that is not educational, but instructional (especially so since in these translations there is no clear right or wrong) is Jacques Rancière’s The Ignorant Schoolmaster: Five Lessons in Intellectual Emancipation.
In his famous book, Rancière speaks of an educational experiment performed in the 18th century by the French language teacher Joseph Jacotot who, in order to teach French to a group of Flemish students, gave them a French book with the Flemish translation by the side and let them, for a few months, learn the language. In essence it speaks about learning without “translations” and “explanations” but with guiding questions; about freedom in the learning process that each student chooses; and about active learning instead of passive receptiveness. For more information in relation to the way we use this reference point in our class watch the video in the following link:……
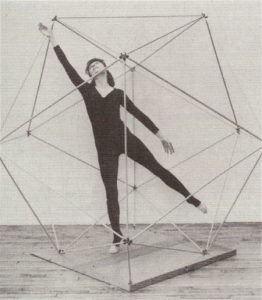
We attach the image of Da Vinci’s Vitruvian Man that we mentioned earlier in class, but a more accurate description for the field of dance is Laban’s kinesphere and the icosahedron, for which we have also attached an image. For more information on Laban’s kinesphere go to the following link:
http://www.laban-analyses.org/laban_analysis_reviews/laban_analysis_notation/space_harmony_choreutics/kinesphere_scaffolding/polyhedra.htm
Course Material