Drawing Everywhere
Body in Motion
TARGET GROUP
Adults with mixed disabilities (mainly intellectual disability and Down syndrome)PARTICIPANTS
21DURATION
2 HoursORGANIZATION
Onassis StegiGoal - Essential question
Our workshop’s main objective is to contribute to the creation of an artistic identity by the participants through dance improvisation. More specifically, its aim is to develop the students’ capacity for self-action and free expression, enhance their communication with others and lead them to understand some fundamental conventions that define dance exercises or scenes, while at the same time expanding their kinetic skills.
Objectives
The lesson’s objective is for the body, on both a conscious and subconscious level, to be set free and to get unlocked through space towards every direction and on every possible level.
And all this will be the result of the body’s attempt to draw its own imaginary painting, using any body part possible as a paintbrush and any place or any other body within the classroom as its canvas.
Vocabulary
air, space, elongation, apply pressure with my body parts, move like an elf – fairy.
Group warm-up following the educator's instructions (10 minutes)
We form a large circle holding each other’s hand. The eyes are closed so as to achieve better concentration. We apply a light pressure with our right palm to the left palm of the person next to us, that we have already been holding for 2 seconds. We repeat 4 times. Group inhale and exhale, with the feeling that the air we exhale is directed towards the centre of the circle.
We open our eyes and bring our palm in front of our face. We observe it for a while (its shape, its morphology, its lines and colour) and with our other hand we draw various lines on it (following the existing lines). We write our name in the air using our hand and we start mixing our letters with those of the people next to us.
Transition (15 minutes)
We walk around freely and each one of us is slowly lead to a part of the wall. We observe it, we define the part of the wall that corresponds to us and we feel it with our hands so as to get to know its texture (whether it has any bumps, whether it is smooth, warm and anything else one might discover). We slowly start creating our painting on it.
Everyone is free to draw whatever they wish. The only limit is the means they use that are determined by the educator.
We start with our hands and fingers and subsequently everyone is instructed to carry on what they are doing using their elbow, their knee and, finally, their head. What those three parts share is that all three are hard; we start with the smallest and end in the biggest. Next we explore other body parts, softer or more unusual like the belly or the nose! At this point the students can suggest parts, saying out loud which part they are using to draw at that given moment.
Demonstration:
After the educator observes how this works, she shows students how to go from using one part to using another without stopping but in a continuous, flowing movement… In practice, so as to not lose contact with the wall we go from one part to the other by rolling the body. That is, if we are drawing with the hand and we want to draw with the elbow, the back of the hand must touch the wall, then the wrist followed by the forearm, and finally the elbow.
Security:
If there are serious kinetic disabilities and the transition from one part to the other is hard then the educator can show how the wall can be used for support and can insist on the continuous contact of the body with the wall. The more relaxed the particular body part is the more pleasant this contact will be and the easier the body’s movement on the wall. If students with intellectual disabilities are unable to understand the flow between the different body parts then the educator can explain to them that the first three parts we used (elbow, knee, head) are like three balls where we go from the smallest to the largest. This instruction will strengthen the rolling feeling from one part to the other.
1st Activity | individual work (15 minutes)
Using the foot as a paintbrush, with a soft movement, we go from the wall to the floor. Now this will be our canvas. Here we have a change of coordinates, our angle to the surface we are drawing on changes and from horizontal it becomes vertical. Our body expands through space. The educator can suggest changes regarding the parts with which the students are drawing, the level from which they are drawing (close to the floor, medium distance or high up), the rhythm, the dynamics, the size and texture of the strokes.
2nd Activity | in pairs (15 minutes)
The last body part that drew in the previous exercise leads us to find a pair. The person who manages to touch someone else’s back first becomes the painter. The other person offers their back as a canvas. The canvas resumes a posture that is comfortable because they will have to stay still and the painter, at first using their hands, is free to create on the back whatever they want. The body offering the back can be standing up, sitting or even lying down, just as long as it finds a position that allows stillness. During the process of drawing the educator can suggest some actions e.g. large soft strokes or small points with the tip of a marker.
The educator asks those offering their backs to feel the painters’ touch and to imagine what the image they are painting is. After this, all the painters walk around (as if they are at an exhibition) and observe the other works, that is they observe the other backs. The backs remain still. The way they (the painters) place their bodies in order to make this careful observation varies and depends each time on the already still position of the back they are observing.
Subsequently they return to their own work and then the backs start moving, changing the position of the canvas. So the drawing turns into a duet where both participants are moving. The painters add some final touches to their work with other body parts that the educator can suggest (e.g. nose, shoulder, forearm). The same exercise is repeated with the pair switching roles.
Discussion (10 minutes)
Everyone remains where they are, they lie down in a comfortable position on the floor, they close their eyes for a while and bring in mind the picture they have drawn so far. They add colours and in general try to bring it to life in their imagination and go through all the stages they have undergone. We discuss the difficulties / ease on both a clearly kinetic level as well as on instances of the process that gave the students joy or made them want to stop.
3rd Activity | in small groups (20 minutes)
We stand up, we shake our bodies as if trying to shed the colours, shapes etc. and we form groups of around 5 people.
We give each group one piece of paper. Drawn on the paper are:
1. straight lines: three or four straight lines of different width, texture and length
2. dots: five or six dots of different size and colour
3. curved lines: three or four curved lines of different width, texture and length
4. circles: three or four circles of different size, colour, filled in or just the outline
Each group works for 5 to 10 minutes exploring the different ways these shapes can be created with their bodies and their movements or any other way they can imagine. It will help mentioning that every shape can be drawn in the air or on the floor in the following ways:
1. by taking the shape with the whole body or part of the body*
2. by making the shape in the air with the movement of part of or the whole body
3. by creating a movement of this shape through space
You can explore other freer or more poetic ways e.g. with objects, with words or any other way you can imagine!
Each group must organize all possibilities in space and time and present them to the rest of the groups.
In the end the educator calls all students in one place and we do free improvisation using the “material” from the presentations by all groups. That is all the shapes are mixed through space, they intersect, they fade into each other or they multiply.
Exercise development
This exercise can be repeated in the next lesson with one group presenting and the other accompanying the act with sounds. It’s best if some work with sounds has been done already in class so that students are familiar with the use of their voice.
4th Activity | in groups (30 minutes)
Here we propose the repetition of the exercise with the Kandinsky painting that was suggested in the 1st lesson plan “AWAKEN SLEEP” with a different development. We bring the Kandinsky painting to class again and we remind the procedure we followed the first time in a shorter version (we observe it, we discuss it, and we imagine it through space).
The whole group goes to one part of the classroom and we define the area of the “stage”.
As we did the first time, the students enter the space one by one and resume a still position, becoming a stroke or a shape of the painting* (3rd activity). The educator can, during this process, make some descriptive comments e.g. Look at this dynamic diagonal line that seems like a ray of light and see how Yannis, who just entered, brought with him a brand new, opposing element like a dark shadow! We ask eight people to get into each painting so that the composition remains clean and is not too crowded. Alternatively, you can give the “audience” the choice of saying “stop” when they feel that the painting is complete. We repeat this procedure twice.
At the end of the second time we give the instruction for the painting to slowly come to life while maintaining the basic form. E.g. the dynamic diagonal line must, at least in the beginning, remain a line but it can gain internal movement or Yannis must keep being the dark shadow, giving it however movement. Eventually the improvisation will break free from the original painting’s form. We repeat this version, giving each time more time at the end for free improvisation.
Warm down (5 minutes)
The whole group forms, slowly, a circle. There one by one they say with one word and one movement what touched them more from today’s lesson.
Contextualizing – Revealing information
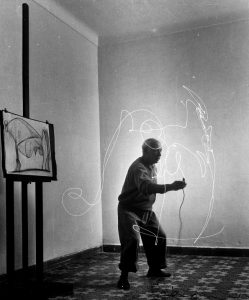
Picasso’s famous light paintings’ photographs demonstrate brilliantly the physicality of the act of drawing. You can print one out (see further down) and show it to students during the 1st activity.
Also, on the subject “drawing and modern dance” one can find numerous examples from the more recent history of dance. The American choreographer Tricha Brown’s experimentations are very well known: https://www.youtube.com/watch?v=U7DQVW6qRq8 . As is the choreography “Violin Phase” from the play “Face” by Anne Teresa De Keersmaeker with Steve Reich’s music: https://www.youtube.com/watch?v=E1OHl8_MPEg&list=PLKoITctm214LFT_WeHnWxgvPv4lXFmewS
Also, the series of video – excerpts from “Improvisation Technologies: A Tool for the Analytical Dance Eye”, an interactive computer installation by William Forsythe in 1999 is very useful for this lesson: https://www.youtube.com/playlist?list=PLAEBD630ACCB6AD45 and https://www.youtube.com/user/GrandpaSafari
Course material
Picasso